

Welcome to the cloud computing blog series. Throughout this series we'll be exploring some amazing technologies in the cloud computing space, ranging from AI, Machine Learning, Big Data, Streaming and Many more.
In this post we will be showing you how to create your first IAM User role in AWS.
Let's PLAY!!
What is Identity Access Management in AWS?
Identity Access Management known as 'IAM' helps users manage access to AWS services and resources securely. It is mostly managed by cloud administrators, who are responsible for the assigning, creation and management of user access to specific AWS resources.
IAM allows more granular control and delegation of AWS resources and in doing so, enables professionals to focus on the resources only pertaining to their areas of expertise. This removes allot of unnecessary complexity and collision between IT roles, for example allowing developers to focus on development resources and services, and administrators to focus on administration and administrative resources.
Here is a short intro on IAM created by AWS:
Let's create our first admin user
Step 1: In the AWS Management Console Search for 'IAM'

Step 2: In the IAM Dashboard click on Groups

Step 3: Click on the Create New Group button to create a new group

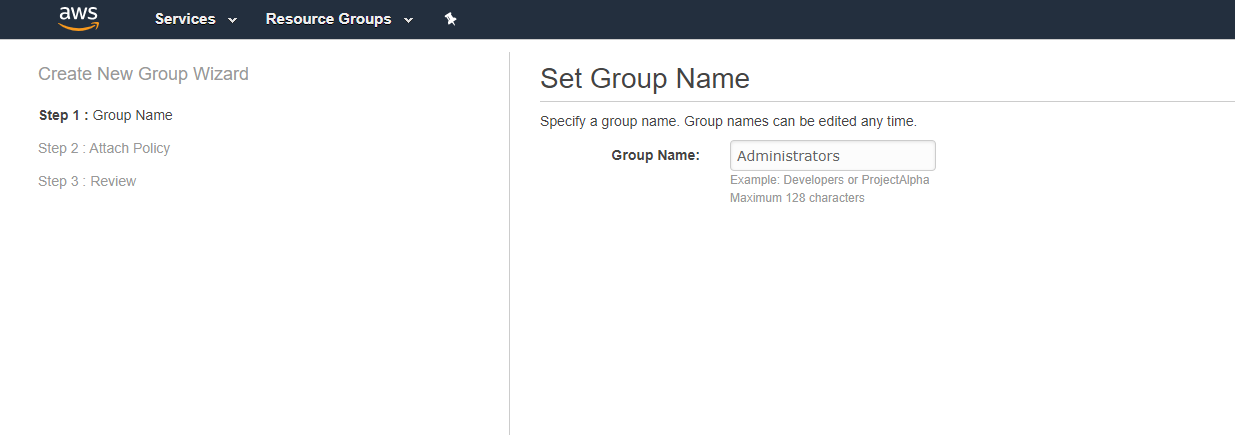
Step 4: Enter a group name, call it 'Administrators' and click on 'Next Step'
Step 5: Attach a the 'AdministratorAccess' policy to the group and click on 'Next Step'

Step 6: Review your group info and then click on 'Create Group'

Step 7: Check that your group has been created

Step 8: Click on 'Users' to create a new user

Step 10: Enter a name for the user

Step 11: Select the access types: Check both 'Programmatic access' and 'AWS Management Console access' then click on 'Next Permissions'

Step 12: Add the user to the 'Administrators' group and click on 'Next Tags'

Step 13: Skip the add tags section for now, it is optional. Click on 'Next Review'

Step 14: Review your info and click on 'Create user'

Step 15: Your user should now be created successfully. Download your access key info by clicking the 'Download .csv' button. Copy the link provided for you to sign in with your new user. Then click on 'Close' button.

Comment: Your access key information will only be shown once, if it is lost, you need to create a new user. It is important to download them at this stage and save the file in a safe place.
Step 16: Verify that the user has been created successfully

Step 17: Go to the link you were provided to sign in at:

Comment: You will be promted to change your password, do so and make sure you can log into the AWS Console with your new user.

Congratulations you have successfully created your first IAM user in AWS.


