
Introduction
Welcome to the Creating Smart Maps with Python and Leaflet Tutorial. In this tutorial we will be building a full stack gis application in python, using open source software.
The purpose of this application is to combine geospatial analytics and software development to create smart geodjango applications.

We will be working with residential water consumption data and we will be applying data processing techniques to extract transform and load the data into our spatial database.
Once we have cleaned and processed the data, we will use it as our data source for building our GeoDjango web application.
The operating system that we are coding on is Ubuntu Linux LTS.
Let’s get started!
Installing PostgreSQL and PostGIS Part1
In this step we will be installing and configuring postgresql and postgis. So let’s open a new ubuntu linux terminal:

And next, let’s switch over to the root user, by entering the following command:
sudo bashThen enter your passerword:

Ok and now the next thing that we need to do is add a repository for postgresql:
sudo sh -c 'echo "deb http://apt.postgresql.org/pub/repos/apt $(lsb_release -cs)-pgdg main" > /etc/apt/sources.list.d/pgdg.list'
And then we add the key:
wget --quiet -O - https://www.postgresql.org/media/keys/ACCC4CF8.asc | sudo apt-key add -
And now we can update our environment, after we have added the repository and key:
sudo apt-get update
So now we are ready to install postgresql, so let’s run the following command:
sudo apt-get install postgresql
Ok now once postgresql has been installed, we can now install postgis by running the following command:
sudo apt-get install postgis postgresql-15-postgis-3
Ok so now we have successfully installed postgresql and postgis.
Installing PostgreSQL and PostGIS Part2
In this step we will be installing gdal, which is a required library for developing gis applications and handling geospatial data.
So let’s first update our system by running the following command:
sudo apt-get update
Ok and now let’s install the gdal libraries:
sudo apt-get install libpq-dev gdal-bin libgdal-dev
Ok so once we have installed gdal we are now ready to create the geospatial database for our application.
Creating the Spatial Database
In this step we will be creating our spatial database, this will store the tables and data that will be used by our application.
So the first thing that we need to do is enter the command line interface of postgresql in full admin mode:
sudo -i -u postgres
So this is the default user that’s created for you when you install postgresql.
Ok so now we are going to create our database by running the following command:
createdb cptwater
So the name of our database will be cptwater.
Now the next thing that we need to do is create a new user for our application to access the database.
Let’s do that by running the following command:
createuser -s waterwatch -P
Now we need to add the password, so the password that we will use for this user is just ‘postgres’ for simplicity sake.
Ok, so now let’s enter into our database from the postgresql shell:
psql cptwater
So the first thing that we need to do is grant all privileges on our databse to our user, which we have called waterwatch:
grant all privileges on database cptwater to waterwatch;
Ok, and the next thing that we need to do is add gis extentions to convert our database into a geospatial database.
So the first extension that we will add is postgis:
CREATE EXTENSION postgis;
And the next extension that we will add is postgis_topology:
CREATE EXTENSION postgis_topology;
Ok, once we have done that we can quit the postgresql terminal by running:
\q
Ok so now we have created the spatial database and user for our application.
Creating a Python Virtual Environment
In this step we will be creating our project folder, as well as creating a virtual environment for our application.
So the first thing that we need to do is create a new folder for our project.
So let’s open our desktop directory in our terminal:
cd Desktop/
And now let’s create our project folder:
mkdir EBISYS-Tutorials
We will call it EBISYS-Tutorials.
Ok so inside our project folder let’s create our application folder:
cd EBISYS-Tutorials/
mkdir WaterWatch
cd WaterWatch/
We will call it WaterWatch.
Ok, and now we are ready to create our virtual environment, we will be using a tool called virtualenv.
Virtualenv will allow us to create a python virtual environment for installing third party libraries, which we will package with our application, instead of installing them directly in the ubuntu system.
But first we need a tool called python3-pip, which is used to install python third party libraries.
So let’s install python3-pip:
sudo apt-get install python3-pip
And now let’s use pip to install virtualenv
So let’s run the following command:
pip3 install virtualenv
Ok so virtualenv has been installed succesfully. So now the next thing that we need to do is create our virtual environment by running the following command:
virtualenv venv
So the venv is the name of our virtual environment, it can be any name, in this lesson we will call it venv.
Ok, so our virtual environment has been created. And now let’s test and see if our virtual environment works.
So to activate our virtual environment we will run the following command:
source venv/bin/activate
Ok so you will see the prefix is (venv), so this means that our virtual environment is active.
So any python third party libraries we install now, will be installed only in our virtual environment, which is seperate from our system. This is to prevent any conflicting third party libraries.
So now to deactivate it, we can just type ‘deactivate’.

Ok, so our virtual environment should now be deactivated and you will see the (venv) prefix is gone.
Installing and Configuring GeoDjango
In this step we will be installing and configuring geodjango
So the first thing that we need to do, is to activate our virtual environment:
source script/bin/activate
Once our virtual environment has been activated, we need to make sure were in our project folder.
Now we are ready to install django.
So let’s run the following command to install the django framework:
pip install django
Ok so now the next thing that we need to install, is a library called psycopg2:
pip install psycopg2
So this library will allow us to connect to our postgresql database from our django application, and will also allow us to read from and write to our postgresql database.
Installing Visual Studio Code IDE
In this step we will be installing our IDE.
So the IDE that we will be using to write the code for our application, is visual studio code.
So let’s download the IDE and install it.
Let’s open up our web browser:

And then we search for visual studio code download:

And then we select this link code.visualstudio.com:

Ok and then we select the debian file for Linux:

And wait for it to finish downloading:

Ok, now let us install visual studio code.
So we locate the .deb file:

Then right click the file, and select ‘Open With Other Application’:

Then select ‘Software Install’, and then click on the Select button:

And now we should see the Ubuntu Sofware Install page for Visual Studio Code:

Then click on the Install button, to install visual studio code:

You might be asked to enter you password, just proceed to do so:

And now we just wait for the installation to complete:

Ok, and now let’s verify that visual studio code has been installed:


Ok, so as you can see our Visual Studio Code IDE has been installed successfully:

Creating the Django Base Application
In this step we will start to create our application, so we are just going to create a django base application.
So we make sure that we are in the project path, and that our virtual environment has been activated:

So let’s run the following command to create our django project:
django-admin startproject waterwatch .The name of the project will be waterwatch in small caps, and then we add a space and a point.
And then press enter.

Ok so now our django base application should be created.
And now let’s list our directory to verify that our project files have been create for us:
ls
Ok, so now the next thing that we need to do is create another folder called waterwatchapp.
So django requires that we have the project folder, as well as the app folder.
So the app folder will contain all our model view controller files. That’s basically all the server side code that we will create for our application.
Ok so now let’s create our app.
So first make sure that we are in our project directory so we can use the manage.py file to create the app folder.
So let’s run the following command:
python manage.py startapp waterwatchapp
Ok so now our app folder should be created, so let’s verify that:
lsOk, so as you can see we have our waterwatchapp folder created:

So now let’s have a look at the files inside:
cd waterwatch
ls
cd ..
ls
cd waterwatchapp
ls
Ok, so now we have created a complete django base project.
So now we will start to write the application code for our project.
Testing the Django Installation
In this step we will be testing our Django installation. We will do this by running the application.
So the first thing that we need to do is change the permissions of the Project folder, so that we can open it in visual studio code.
So let’s deactivate our virtual environment and go back to our desktop directory:
deactivate
cd ../
cd ..
Ok and now let’s run the following command to change the permissions of the project folder:
chmod -R 777 EBISYS-Tutorials/
Ok and now we have enabled full permissions on this folder. This is not a very secure approach, but because our focus is on learning geodjango, we won’t worry about the details of file permissions for this tutorial.
Ok and now the next thing that we need to do is, we need to open the project source code inside our IDE.
So let’s open up Visual Studio Code:


OK, and then select the Explorer button:

And then select open folder and then we locate our project source code.

So here’s our project folder and then click on open folder:

OK, so as you can see. Our project has been opened in our IDE.

So the next thing that we need to do is we need to install the python extension.
So we click on extensions:

And in the search type in Python:

OK, and then click on the Python extension.
It says Python by Microsoft:

And then click on install:

So we just waiting for the extension to complete installing.
Ok, so once the extension has been installed, we can close all windows.

And let’s go back to Explorer:

Ok, so now the next thing that we need to do is we need to open up our terminal from within Visual Studio.

So we click on View and then terminal:

Ok, so it should automatically activate your virtual environment, if it doesn’t then we can just manually activate our virtual environment.

Ok, so now the next thing that we are going to do is we are going to run our application server. So to do that, we will use the manage.py file.
So here’s the manage.py file in the project directory:

So now let’s run our server:
python manage.py runserver
OK, so as you can see, our server has started at port 8000 using the local host IP:

So usually I just hover over this IP and then click on follow link. Or you can just copy and paste it in your Web browser.
So the quickest way is just to click on follow link:

Ok, so now we should be able to see this django page that tells us that the installation worked successfully:

Now we know that our django application is running successfully in this URL.
Adding the Spatial Database to our Django Backend
In this step, we will update our settings.py code
We will also establish a connection to our spatial database that we have created previously, in the ubuntu shell.
So we can close the browser:

And then we can terminate the server by pressing control+C:

Ok, so first we need to install a couple of third party python libraries, that will allow us to manipulate geospatial data from within our application.
So our virtual environment is activated. And now we can install the third party libraries.
So the first library that we need to install is django-leaflet:
pip install django-leaflet
Ok, so that was successfully installed.
And the next library that we need to install is django-geojson:
pip install django-geojson
So this will allow us to read and manipulate geospatial data in JSON format.
Ok, and then the last library that we will install for now is just geojson:
pip install geojson
So now we have installed the geo libraries that we need.
The next thing that we need to do is, we need to start modifying our source code. So we will start by modifying our settings.py code.
So let’s open the settings.py file:

Ok, so the first thing that we are going to do is, we are going to add the django.contrib.gis app, inside of the installed apps.
So we will create another element called django.contrib.gis:

And then we need to add our own app, which is called waterwatchapp:

Ok, so now the next thing that we are going to do is, we are going to modify the database connection string, which is over here:

So this will define the connection string to allow us to connect to our spatial database.
So, first of all, the engine that we are using is postgis. We won’t be using sqlite.
So we will replace that with django.contrib.gis.db.backends.postgis:

And then the name, is the name of the database that we will be using.
And we said the name of the database would be cptwater:

Ok, so we also need the username that we will need to connect to our database.
And the user, which we have created in postgresql shell was waterwatch:

And then we need to add the password for the user.
And we said that the password was simply postgres.

So that’s the same password that we use for every application.
Ok, and then lastly, we need to specify the host. So the host is the IP that the database server is running on.
And in our case, it’s running on localhost:

OK, so now we’ve updated our settings.py code. And now we can run the migrate statement so that the database connection will be created.
So let’s do that.
So first we save the source code with Ctrl+s.
Now in our command line, we will run:
python manage.py migrate
Ok, so the connection to postgresql has been established:

So now we have established a connection to our postgresql database from within django.
Creating a Django Admin User
In this step, we will be creating the django admin user. So django has an administration portal that allows us to connect to our database, and then allows us to test and see if we can retrieve the data that has been stored in our database.
So it’s a good tool to use, to test and see if you if you can make a connection to your database.
So firstly, we need to create the user so that we can log into the admin console.
So to do that, we are going to run the following statement:
python manage.py createsuperuser
So the username will be the same as the username for our database, so we want to keep the same username and password.
So it’s waterwatch:

And then just press enter to skip the email, and then enter the password, the password would just be postgres, and then type it in again:

Ok, so we can see the superuser has been created successfully, so now let’s test and see if we can log into the django administration portal.
So let’s run the server:
python manage.py runserver
Ok, now let’s open up the url link where our server is running at:

Ok, so in the url we are going to add a /admin, to read the admin portal.

So now let’s type in our username that we have created, and then the password we said was postgres:

Ok, so let’s go to users to verify if our user has been created:

So as you can see, we have created our user successfully, which is waterwatch:

Creating the Model
In this step, we will create the model class of our application.
So the model will be the table which will store the data that we will be working with. And that is created in the models.py file.
So if you haven’t already, you can close the Web browser and then terminate the server.
And then the next thing that we need to do is click on models.py:

Ok, so now we can add the source code.
We’ll start by commenting out the first import statement that we see here, because we are not using a standard django model, we’ll be using a GIS model:

So we can add that:
from django.contrib.gis.db import models
So we added this app in our settings.py file, django.contrib.gis:

And now we are using its model.
If we go back, you can see that we have added it as an app over here:

And now we will use it in our application.
Ok, so now the next thing that we need to do is, we need to create a model.
And that is created over here, we can see create your models:

So basically a model is just a class. So you can copy the class below, and we will go through the code:
class WaterConsumption(models.Model):
    Id = models.IntegerField(primary_key=True)
    Suburb = models.CharField(max_length=100)
    NoOfSingleResProp = models.IntegerField()
    AvgMonthlyKL = models.IntegerField()
    AvgMonthlyKLPredicted = models.IntegerField()
    PredictionAccuracy = models.IntegerField()
    Month = models.CharField(max_length=50)
    Year = models.IntegerField()
    DateTime = models.DateTimeField()
    geom = models.PointField()

    def __str__(self):
        return self.Suburb

    class Meta:
        verbose_name_plural = 'WaterConsumption'
So it’s pretty straightforward.
To create a model, we create it as a class and we give the class a name, we call it WaterConsumption:

And then we give it a type which is a Model.
So we are saying that this is a GIS Model:

And then we add the fields.
So we’ll have an Id, and then we specify the data type for that field:

So this is an integer type field.
And then we specify that this field is a primary key:

And then we have a Suburb, and this is of type Char field. And then we give it a length of 100 characters and so on.

Ok, and then we have the geometry field:

So this will be the field that will store all the GPS coordinates.
This will be our Latitude and Longitude values:

And then we have the data type, which is of type Point field:

So this type of field is only available in a GIS model.
Ok, so what we have done is create the schema for our PostgreSQL table. And these will be all our fields in the table, and their data types:

This will be the name of the table:

We’ll call the table WaterConsumption.
And then over here is where we add the metadata:

So basically we’re saying that each record in our table will be grouped by a Suburb:

Each name of the Suburb will be unique. So each record will be identified by it’s Suburb.

But this is only necessary when using the django admin portal. Otherwise, it doesn’t really matter in PostgresSQL.
Ok, and then we’re just giving an alias to our model:

So this is how we want our model to appear in the django admin portal. We’re just giving that the same name as the table name.
So if we want to create another table, we just create another class:

And we’ll give it another name like Dams, Model and then we’ll just add the fields etc, so that would be the second table.
So that’s basically how you create a model in Django.

And this model will be converted into a table in PostgresSQL.
Ok, so we can save the code.
And now the next thing that we need to do is run our migrations to make sure that our changes have been saved, and that this table gets created in PostgresSQL.

Ok, so we run:
python manage.py makemigrations
Ok, so you can see that the model will be created in Postgresql:

And now we need to run migrate:
python manage.py migrate
And this will actually save the settings and create the table in PostgreSQL.
Ok, so the table has been successfully created for us in PostgreSQL:

We will be testing this in the django admin portal. So that’s where we will test and see if our data has been successfully stored, and if postgis and posgresql have been integrated successfully.
Downloading the Sample Dataset
In this step, we will be downloading the dataset that we will be working with in our application.
So let’s open up our Web browser.

Ok, so we can search for ebisys github:

Let’s just click on ebisys github:

Ok, and then we can select the waterwatch repo:

So the file that we want is this one, which is called waterwatch_clean2.xlsx:

So we can click on that, and then just click on download.

Ok, so let’s locate the file:

So now we can copy the file into our project root directory. So we locate our project.

So the same place where the manage.py file is, we paste it there:

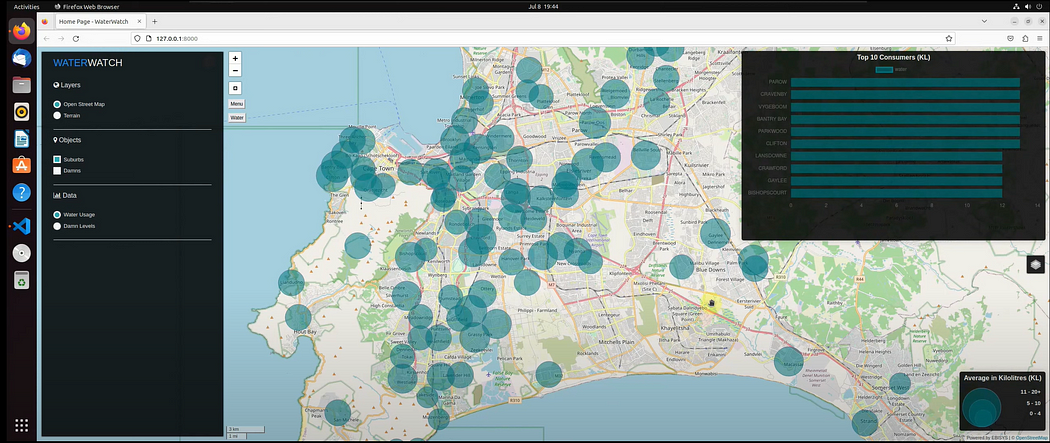
Ok, so basically our dataset contains the water consumption value for each suburb for a specific month. So this is the amount of water consumed in kilolitres by each suburb in the Cape Town region.
Ok, so now that we have done that, we can see that our file is an Excel file.
So now we have to download the third party libraries that we need, in order to read Excel files, as well as the data manipulation library that we will use to transform the dataset.
So we can we can close these windows:


Ok, so we just verify that the file is there:

And now let’s install the third party libraries that we will need to read the Excel file.
So the first library that we install is xlrd:
pip install xlrd
And then we run:
pip install openpyxl
So this is also an excel reading library.
So now the next library that we need to install, is the one that we will use to manipulate our dataset from within our application, which is pandas:
pip install pandas
Ok, so Pandas has been successfully installed:

So now we have our data manipulation libraries installed.
Ok, now let me just give a run through of the dataset that we will be working with, and how it applies to our application.
So our application analyzes the amount of water that gets consumed by each suburb for the given month. The value will be in kilolitres, it’s the average monthly kilolitre of water consumed by each suburb.
We want to be able to identify the suburbs that are consuming the most amount of water. And then we want to target those suburbs and maybe send out an alert email, telling them that they are consuming too much water, and that they need to cut down. Or we can even alert the municipality and they can control the amount of water that gets distributed to those suburbs.
So basically, that is the reason why we are working with this dataset and how it applies to our application.
Creating the GeoAdmin and Testing the Spatial Backend
In this step, we will add the code for an admin.py file.
So let’s open up the admin.py file:

Ok, so the code that we will add will read from our dataset file. And then we will extract the data into a pandas data frame. And from there, we will transform the data so that we can store it into our spatial table.
But before we do that, we need to use an object from the leaflet app. So we will add the leaflet app in our settings.py file.
So let’s open that:

And then in the list of INSTALLED_APPS above the waterwatchapp, we will add an app for leaflet:

And then add a comma, and then save the file:

Now we can open up the admin.py file again:

So now let’s add the code for our admin.py file.
Firstly, we will add a couple of import statements:
from django.contrib import admin
from django.contrib.gis.geos import Point
from datetime import datetime
from leaflet.admin import LeafletGeoAdmin
import pandas as pd
from pandas import ExcelWriter
from pandas import ExcelFile
from waterwatchapp.models import WaterConsumption
Ok, so we want to add a Point object, so this will store our latitude and longitude values.
And then we will also be importing the datetime object, in order to get the current date that we will use to insert a record into our table. So we want to see the date and time in which that record was inserted.
And then we will also be using the LeafletGeoAdmin class. So in the admin.py file, you have to register your model to the admin class.
And instead of are importing a standard django admin class, we will be using a geo admin class. And we have gotten that from the leaflet app that we have just added over here:

Ok, and then we will import our model.
So we need the model to be registered to the admin class.
And then we will use pandas to do our data transformation, as well as read from the data file.
So let’s first create a geo admin class:
# Register your models here.
class WaterConsumptionAdmin(LeafletGeoAdmin):
    pass

admin.site.register(WaterConsumption, WaterConsumptionAdmin)
Ok, so basically, to create our admin class, we need to specify the name of the model, as well as append the word Admin:

So this is what django requires.
And then we specify the type of admin class that we want to use. We want to use the LeafletGeoAdmin class:

So that’s all we have to do.
And now we need to register the class.
So it’s just admin.site.register:

And you pass in the the model as well as the admin class for that model:

Ok, so that’s what we have to do before we can use the model.
And now the next thing that we need to do, is we need to read the contents of our data file into a pandas dataframe:
df_excelReader = pd.read_excel("/home/ebisys/Desktop/EBISYS-Tutorials/WaterWatch/waterwatch_clean2.xlsx")
So we just create a variable to store our dataframe, we call it df_excelReader.
And then we use pandas.read_excel in order to read Excel files. If we wanted to read a standard text file, we would use read_csv.
And then we specify the location of our file. We dropped it in the root directory of the project.
And then the name of the file.
Ok, so now we need to test and see if we are able to read from the file.
So we’re just going to print the first five records of the dataframe:
print(df_excelReader.head())
So we use the .head() function to print the first five records of the dataframe.

So let’s save the file and then run the application, to see if we are able to read from the file:

Ok, so as you can see, we have successfully read from our file, and here we can see the contents of the file:

We have the Suburb field, which is the name of each suburb.
We have the Oct 2017\nkl/month field, which is the average kilolitre consumption value.
And then we have the Latitude and Longitude value for each suburb.
Ok, so now we can terminate the server Ctrl+c:

And we can comment out the print statement, because now we know that the data is stored inside of our dataframe:

Now the next thing that we need to do is, we need to loop through each record in the dataframe, and then write the record to our table.
So let’s add the code for that:
for index, row in df_excelReader.iterrows():
    Id = index
    Suburb = row['Suburb']
    NoOfSingleResProp = row['Number of single-residential properties_number']
    AvgMonthlyKL = row['Oct 2017\nkl/month']
    AvgMonthlyKLPredicted = 0
    PredictionAccuracy = 0
    Month = row['Month']
    Year = row['Year']
    DateTime = datetime.now()
    Longitude = row['Longitude']
    Latitude = row['Latitude']

    WaterConsumption(Id=Id, Suburb=Suburb, NoOfSingleResProp=NoOfSingleResProp,
                     AvgMonthlyKL=AvgMonthlyKL, AvgMonthlyKLPredicted=AvgMonthlyKLPredicted,
                     PredictionAccuracy=PredictionAccuracy, Month=Month, Year=Year,
                     DateTime=DateTime, geom=Point(Longitude, Latitude)).save()
So if we want to loop through a pandas data frame, we need to create a for loop.
Then we specify an index and a row:

So all the contents of each row will be stored in this row variable, and then specify the name of the dataframe and iterrows():

So that’s how you loop through a pandas dataframe.
Ok, so now the next thing that we need to do is, we need to store each value of the record into a variable. And then we use the variables to write the record into our table.
So we just create a variable with the same name as the field name:

So for instance the Suburb value, we extract from the row variable. And then we search for the Suburb field and we extract that value and so on:

And here we have the Longitude and Latitude values:

So there are two separate fields. We will combine them into one object, which is the Point object.
So that’s why we have imported the Point object:

Ok, so now we are ready to save this record to our table.
So we are going to use our model that we have imported:

So basically, if we want to insert a record, we do the following:
We take the field name from of our model, and we map it the value that we have extracted and stored into our variables:

So for each field, we extract the specific value and then we map it to a field name from our model.
So we will be doing that for every field.

Ok, so once we have done that for every field, we save that record into our table:

So over here we have the geom field, and we used the Point object in order to group the Longitude and Latitude values.

So that is how we will be storing the location information for every suburb.
And then we add save(), to save the records, and this will loop through every record in our data frame and then store that record into our water consumption table.
So let’s save the file.
And then run the server and test and see if our data has been inserted into our table:
python manage.py runserver
Ok, so we have no errors:

Now we can open our application in the Web browser.
Click on follow link:

Ok, so now we will verify that the data has been inserted into our table using the django admin portal.

So we add forward slash admin (/admin):

Ok, so firstly, we can see that our table was created for us:

Now, let’s click on that.
Now we can see the value of every suburb:

So our table now contains data that was inserted by our code.
And if we open a suburb:

We can see the information that is stored about that suburb:

So we have the Suburb name. And we have the Id value, which is just the index. And then we have the average kilolitres consumed.
We also as have the geometry field, which contains the latitude and longitude values:

So it stored that as a point:

So we can see that when we look at the name of the suburb, it matches the suburb name on the map:

So we can see that the point is placed accurately inside the suburb.
So basically, if you can see the leaflet map and the point is accurately plotted, it means that the spatial database has been successfully configured and integrated with our application.
So now we can start to move on to creating the visual aspect of our application. And we can now use the data that we have stored in our spatial database and display it on the map.
Want to continue immediately? Check out the full video course below!
https://ebisysedu.thinkific.com/courses/create-smart-maps-in-python-and-leaflet-linux-version
Youtube video tutorial available below:
Be sure to enroll below for more tutorials like this:


